Neotask Code
Start And Review A Coding Task
- Open Code.
- Select or create a project.
- Describe the change in the project chat.
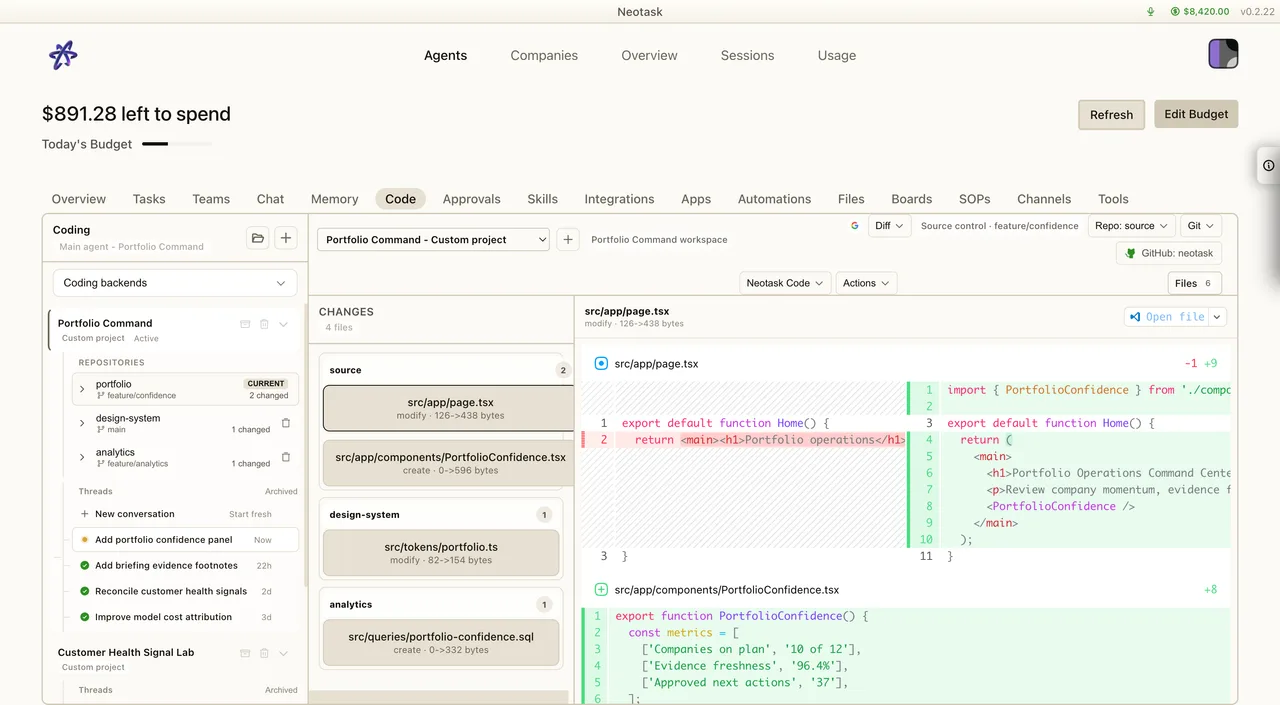
- Review changed files and verification output before committing.
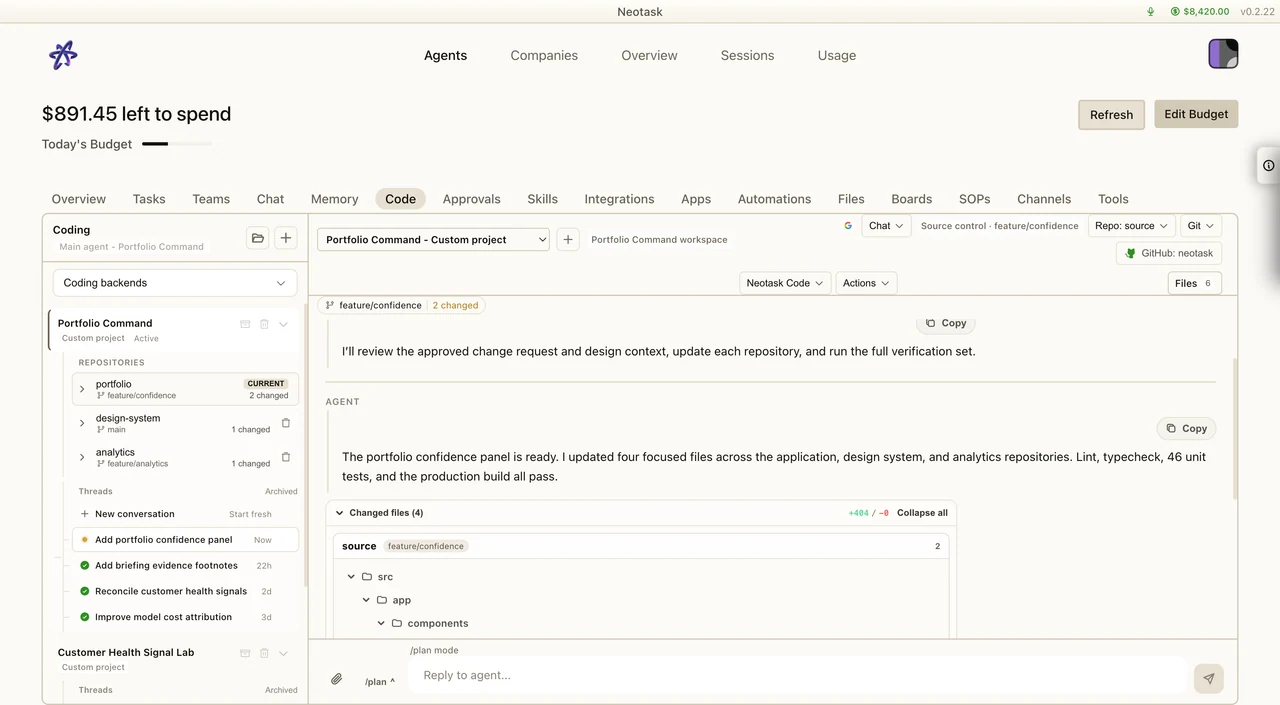
Neotask Code is the built-in coding agent inside the Neotask desktop app. You describe what you want in plain language, and it writes and edits real code in a real project on your machine, runs your build and tests, and (when you connect a repository) commits and pushes your work to GitHub. Everything runs inside the same Neotask app you already use for agents, companies, and channels, so your plan, credits, and approval settings all apply.
This page explains what Neotask Code is, how projects and conversations work, and the different coding engines you can run it on. For the git and GitHub side, see Neotask Code: Git and GitHub. For how approvals and containment keep it safe, see Neotask Code: Safety and Approvals. To bring eligible setup and recent local history from Claude Code, Codex, Cursor, Grok Build, Kimi Code, and other detected apps into Neotask, see Import From Other AI Apps.
What You Can Build
Neotask Code is a general-purpose coding assistant. You can use it to:
- Start a new app or script from scratch.
- Open an existing project and make changes across many files.
- Fix bugs, refactor, and add features by describing the outcome you want.
- Run your project's build, test, and lint commands and act on the results.
- Preview a web project against its own local development server.
- Connect a GitHub repository and commit, push, branch, and open pull requests directly from the conversation.
The agent works the way a developer would: it reads the relevant files, makes edits, runs commands to check its work, and shows you every change in the conversation as it happens.
Projects, Conversations, and Working Copies
Neotask Code is organized around projects. A project is a self-contained workspace on your computer that holds one codebase and everything the agent needs to work on it.
- Project: a single coding workspace. Each project lives in its own folder that Neotask manages, and the agent is confined to that folder. You can create a project from an empty folder, from a local folder you already have, or from a GitHub repository.
- Conversation: the chat thread where you talk to the agent about a project. Each turn you send is a coding request; the agent responds by editing files and running commands, and the whole transcript stays with the project so you can follow what was done and pick up where you left off.
- Working copies (worktrees): within a project you can create additional working copies so you can keep more than one branch checked out at the same time, side by side, without disturbing your main working copy. This is useful when you want to try an idea on a separate branch while your main copy stays untouched. Working copies can be created and removed as you need them.
- Checkpoints: Neotask Code can take a checkpoint of the project so you have a known-good point to return to. If a change goes in a direction you do not want, you can restore the project to an earlier checkpoint. See Neotask Code: Safety and Approvals for how checkpoints fit into the safety model.
Each project keeps its own history, its own connected repository, and its own settings, so work on one project never leaks into another.
A conversation also remembers which repository, branch, and working copy it belongs to, so a restart does not move your work. Every turn runs inside that session's working copy. If the working copy folder is missing, Neotask repairs it before running, or stops with a clear message if it cannot. Cleanup never deletes uncommitted work, and a development server from an earlier run is stopped or adopted safely instead of being left holding the port. Whether a coding session reopens by itself after a restart is controlled by Continue work after restarts in Settings -> Automations, which is on by default. See Continue Work After Restarts.
Choosing a Coding Engine
Neotask Code can run on more than one underlying coding engine. The engine is the agent loop that actually does the work; you pick one per project, and you can see a short description of each option where you choose it. What changes between engines is which account and models the work runs on.
| Engine | Runs on | Models | Billing |
|---|---|---|---|
| Neotask Code (built-in) | Neotask, through your current sign-in | Any model eligible in your plan and mode | Your Neotask credits, or your connected provider login, or your own key (see below) |
| Claude Code | Your connected Claude account | Claude models from your account | Your own Claude subscription |
| Codex | Your connected OpenAI account | OpenAI models from your account | Your own OpenAI subscription |
| Cursor | Your own Cursor account | Models offered by Cursor | Your Cursor subscription (never uses Neotask credits) |
The built-in Neotask Code engine is the default and the simplest to start with: it works with whatever sign-in you already use for the rest of Neotask, and you can pick from the models your plan makes available. The other engines let you bring an outside coding tool you already pay for and run it through Neotask instead of a separate window, so your projects, approvals, and git connections all stay in one place. Choosing one of them runs your work through that tool on your existing account for it; you do not create a second, separate Neotask login.
How billing works per engine
- Built-in Neotask Code follows the same billing as the rest of the app. Depending on how your workspace is set up, that is your Neotask credits, a coding provider you have signed into, or your own API key if you use Bring Your Own Key. See Billing and Plans, Usage Rates, and Bring Your Own Key.
- Claude Code, Codex, and Cursor run on the outside account you sign into for each of them. Their usage is billed by that vendor to your account with them, on their models, not through Neotask credits.
You can change which engine a project uses; starting a new engine begins a fresh conversation context for that project.
Getting Started
- Open the coding area in the Neotask desktop app.
- Create a project: start from an empty folder, open a folder you already have, or connect a GitHub repository. See Neotask Code: Git and GitHub for the repository options.
- Pick a coding engine (or keep the default built-in engine) and, for the built-in engine, choose a model.
- Describe what you want in the conversation. The agent reads your project, makes changes, and runs commands, showing each step as it goes.
- Review the changes. When you are ready, ask it to commit and push, or open a pull request, if you have connected a repository.
The activity feed keeps source changes and verification output with the coding conversation.
Coding is available on the Free plan within the Free message quota, and without limit on paid plans. See Getting Started and Free Plan for what each plan includes.
Availability
- Built-in Neotask Code, Claude Code, Codex, and Cursor engines are available today.
- Multi-repository projects (one project that holds several connected repositories at once, so a single conversation can work across, for example, a server and its client together) are shipping soon. Today each project connects to one repository.